SiteplanCAM is a software program to tag your progress photos with
a “you are here” arrow on a project site plan map so you
will know where the picture was taken
Where Was That Picture Taken?
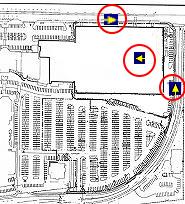
SiteplanCAM is pretty simple. Display a site map of your project and place on the site map an arrow on the spot where the photographer is standing when the photo is taken. Make the arrow point in the direction the photographer is facing (like the site map on the far left). Then just touch the arrow with your mouse pointer and the photo taken at that spot is displayed (Try it. Move your mouse pointer and touch the arrows circled in red on the site map to the left).
Ok, Neat, But What Will SiteplanCAM Do For Me?
Taking progress photos is a fact of life for all projects. What you do with these photos will vary greatly from project to project and photographer to photographer. SiteplanCAM is a method to organize these photos so that they have use and purpose during the project and retain usefulness after the project is complete.
During the project, time is the biggest obstacle. Time to take the photos, time to organize the photos to tell the project story properly, and time to organize the photos for storage and retrieval. With SiteplanCAM, a photo is cataloged by simply a point and click on a site map. The coordinates (and direction) of the photo are associated with the photo along with additional optional information like a short text description or even an “issue” reference number like an RFI or change order. See the topic FldFOTO below for more information on this tagging)
After tagging a photo, you can “zip” selective photos to send off-site. You can also update these photos into a “photoboard” that chronologically displays all the photos in one place. You can use the option that saves all your photos automatically in a “week-ending date” folder that you can single-click and display from your Windows Desktop.
If this is not enough, you can choose to publish progress photos on the Internet that you select. If you decide to pass-word protect the website, access to these photos would be “by invitation only.” Click
here to see a sample (not password protected).
And if seeing progress on your computer Internet browser is not enough, you can also choose the option to view these progress photos on a mobile cell phone equipped with a web browser (this is a special website configured for the smaller viewing screen).
At the end of the project, all the photos are stored and organized on an archive quality CDROM. Photos are selectively displayed by week by using a point-and-click calendar. Superimposed on a site map are arrows pointing to where a picture was taken. Print a copy of the photo and
include a printed site map with the arrow for the photo. For a quicker chronological display, a “photoboard” is included to make it easy to view the photos in a slideshow format. Click
here to see an example of a CDROM.
FldFOTO for the field
Mentioned above, siteplanCAM catalogs and organizes the photos taken in the field with a “point-and-click” technique. The computer program that does this is called
FldFOTO. This is a simple program installed locally on a field PC or laptop that will load-in the photos taken by a digital camera and present the images to the User one at a time next to a site map of the project. The User only needs to click on the site map the spot where the photographer was standing when the picture was taken and the direction by using clicking a compass-like heading. Optionally, a short description can be added. Click
here to see a few screenshot samples.
FldFOTO has a built-in capability to take the tagged photos and compress them (zip) into a single file. This single file can be used as an email attachment for transfer to a designated location. This single file also includes the tagging and descriptive information database. If your project requires photo submissions to an Owner along with photo descriptions, an optional program is available to convert the fldFOTO photo descriptions into a Word document.
What Do I Need To Do To Try This Out?
Basically, all we need is a letter-sized copy of your site map and a signed service agreement. We will review your site map and work through any questions and changes with you so that "arrows" on the site map makes sense. There is an initial setup fee to take the site map that you submit, rework it and convert it so it will work with fldFOTO. A customized version of fldFOTO on a CDROM will be mailed to you. It will contain your project setup information and site map. Use the self-contained installation program to install the fldFOTO program on a local Windows based machine. Watch a short training tutorial on how to use fldFOTO. Take some pictures, try it out.
Once comfortable with how the fldFOTO program works, take a set of photos, compress them and email them to us. We wi ll publish the photos on a password protected website and email you the link to the website with an email notice. After the project is complete, send us an email and we will process the photos into a CDROM and mail it to you.
Click
here to take a look at our service agreement.
Click
here to load a PDF Service Application that you can print.
 Simple Innovative Interesting